Installation And Construction Of Suspended Full Glass Curtain Wall
Leave a message
1. Laying out and positioning
Laying out is a technically difficult task in the installation and construction of glass curtain walls. In addition to fully understanding the design requirements, it also requires rich work experience. Because some detailed structural treatments are not clearly explained in the design drawings but are left to the operator to deal with in combination with the on-site conditions, especially for high-rise glass curtain walls with large glass areas and many floors, the laying out is more difficult.
(1) Measurement and laying out
The measurement and laying out of the curtain wall positioning axis must be parallel or perpendicular to the main axis of the main structure to avoid conflicts between the curtain wall construction and the indoor and outdoor decoration construction, resulting in defects such as uneven corners and uneven decorative surfaces. Use high-precision laser levels and theodolites, and use standard steel tape measures, weights, and level rulers for verification. For curtain walls with a height greater than 7m, the measurement and verification should be repeated twice to ensure the vertical accuracy of the curtain wall. The deviation of the upper and lower center lines is required to be less than 1-2mm. The measurement and layout should be carried out when the wind force is not greater than 10000. The error between the actual layout and the design drawing is usually solved by appropriately adjusting the width of the gap and the positioning of the frame. If the size error is large, it should be reported in time so that a new glass or other methods can be taken to solve it reasonably.
(2) Layout and positioning
The suspended full-glass curtain wall directly fixes the glass to the main structure. In this case, the position of the glass should be bounced to the ground first, and then the anchor point should be determined according to the outer edge size.

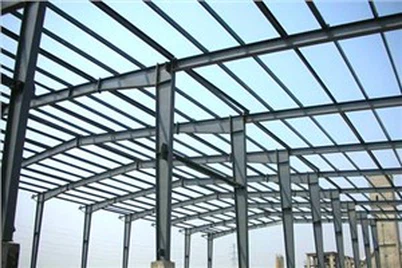
2. Installation of the upper load-bearing steel structure
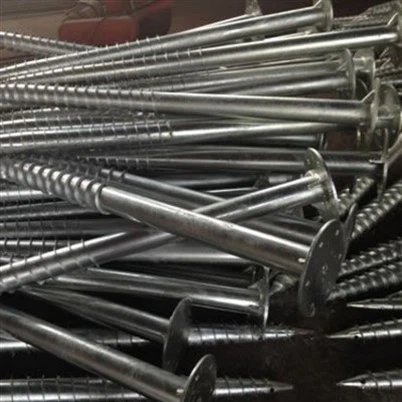
Pay attention to checking the firmness of the embedded parts or anchor steel plates. The quality of the selected anchor bolts should be reliable. The anchor bolt position should not be close to the edge of the reinforced concrete component. The drilling hole diameter and depth should comply with the technical regulations of the anchor bolt manufacturer. The ash residue in the hole should be blown clean.
The installation position and height of each component should be strictly carried out by the layout positioning and design drawing requirements. The most important thing is that the center line of the load-bearing steel beam must be consistent with the center line of the curtain wall, and the center of the elliptical screw hole must be consistent with the designed hanger bolt position.
The installation of the inner metal clip must be smooth and straight. Use segmented wire drawing to check, and adjust the deviation caused by welding. The outer metal clips should be assembled according to the number, and they should also be straight. The spacing between the inner and outer metal clips should be uniform and the size should meet the design requirements.
After all steel structures are welded, the quality inspection of the concealed project should be carried out. Please ask the supervision engineer to sign the inspection. After the inspection is qualified, apply anti-rust paint.
3. Installation of the lower and side frames
The construction should be strictly carried out according to the layout positioning and design elevation. All steel structure surfaces and welds should be painted with anti-rust paint. Clean the dust in the lower frame. At least 2 neoprene pads should be placed under each glass. The width of the pads should be the same as the width of the slot and the length should not be less than 100mm.
4. Glass installation
(1) Glass hoisting
The installation of large glass is a very meticulous and precise overall organization construction. Before construction, check whether the personnel at each workstation are in place, whether all kinds of machinery and tools are complete and normal, and whether the safety measures are reliable. The tools and parts for high-altitude operations must be in a tool bag and placed securely to prevent objects from falling and injuring people or breaking the glass. The glass can be hoisted only after all inspections are completed.
Check the quality of the glass again, especially whether the glass has cracks and broken edges, and whether the position of the copper clip is correct. Wipe the dust on the surface of the glass with a dry cloth, and mark the center position of the glass with a marker. Install the electric suction cup machine. The electric suction cup machine must be positioned, symmetrical on the left and right, and slightly above the center of the glass, so that the lifted glass will not deflect to the left or right, and will not rotate. Test the glass and lift the glass 2-3cm to check whether each suction cup firmly absorbs the glass. Install manual suction cups, cable ropes, and side protective rubber sleeves at appropriate locations on the glass. The manual suction cups on the glass allow workers working at different heights to assist the glass in place by hand when the glass is in place. The cable rope is to enable workers to control the swing of the glass when the glass is lifted, rotated, and in place, to prevent the glass from being out of control due to wind and crane rotation. Glue low-foaming spacer square adhesive strips on the inner side of the upper and lower frames where the glass is to be installed. The width of the adhesive strips should be the same as the designed adhesive seam width. When gluing the adhesive strips, leave enough adhesive injection thickness.
(2) Glass in place
After the crane moves the glass to the position, the driver should follow the commander's command to operate the hydraulic micro-operating lever to align the glass to the position. The upper workers should hold the glass well to prevent the glass from colliding with the steel frame when it is raised or lowered. After the workers at each station on the lower level can hold the manual suction cup, the protective rubber sleeve on one side of the joint can be removed. Use the manual fall chain of the hanging electric suction cup to slowly lift the glass so that the lower end of the glass protrudes slightly beyond the lower frame. At this time, the lower workers should gently pull the glass into the notch in time and use wooden boards to block it to prevent it from colliding with adjacent glass. In addition, some workers use wooden boards to support the lower end of the glass to ensure that the glass can be placed in the notch of the bottom frame when the falling chain slowly lowers the glass. Avoid the lower end of the glass from colliding with the metal notch. Glass positioning. After installing the glass hanging fixture, the hanging rod bolt should be placed at the positioning position marked on the steel beam. Adjust the rod bolt repeatedly to lift the glass and put it in place correctly. After the first glass is in place, check the verticality of the side of the glass. For the subsequent glass, you only need to check whether the upper and lower gaps are equal to the glass that has been in place and meet the design requirements. After installing the upper outer metal clip, fill the foam plastic round strips in the outer grooves of the upper and lower frames to fix the installed glass temporarily.
5. Injection of sealant
(1) All glass and metal surfaces at the injection site must be wiped clean with acetone or special cleaning agent. Do not wipe with a wet cloth or clean water. The surface of the injection site must be dry.
(2) Stick adhesive tape along the glue joint to prevent silicone from contaminating the glass.
(3) Trained professional glue injectors should be arranged for construction. The injection should be carried out simultaneously on both the inside and outside. The injection should be uniform and thick without bubbles.
(4) After injection, use a special tool to scrape the glue to make the glue joint a slightly concave surface.
(5) Glue injection should not be carried out on rainy and windy days to prevent rain and sand from invading the glue joints. In addition, glue injection should not be carried out at low temperatures below 5 degrees. If the temperature is too low, the glue will flow, delay the curing time, and even affect the tensile strength. Strictly follow the product instructions for construction.
(6) The construction thickness of weather-resistant silicone caulking glue should be between 3.5 to4.5mm. Too thin glue joints are not conducive to ensuring sealing quality and preventing rain.
(7) The glue is 6mm and the commonly used width is 8mm. When the wind load is large or the earthquake protection requirements are high, 10mm or 12mm can be used.
(8) Structural silicone sealant must be used within the product validity period, and the construction acceptance report must have product certification documents and records.
6. Surface cleaning and acceptance
(1) Clean the inner and outer surfaces of the glass.
(2) Check the glue joints again and make necessary repairs.
(3) Organize construction records and acceptance documents to accumulate experience and information.